 ReStore Staff
4 Simple Decorating Ideas for the Holidays
Guest blog by Jill O'Gorman, professional designer
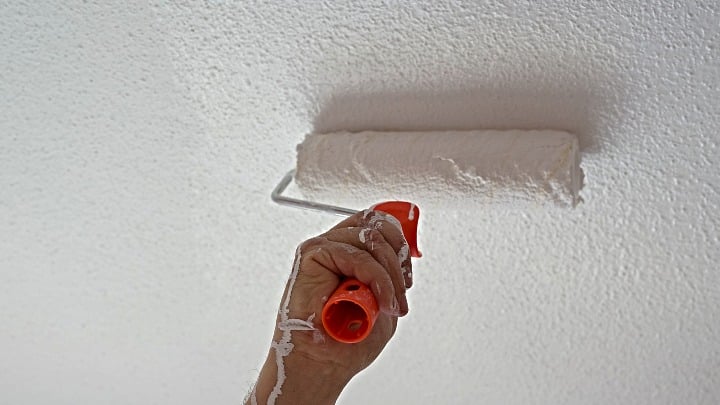
Over time, dust and dirt can build up on any ceiling, but popcorn ceilings (also known as stipple, stucco, or acoustic ceilings), seem to be a magnet for grime. Scraping the "popcorn" from your ceiling is a lot of work–and it could even be dangerous. So consider giving your room a fresh look with a simple coat of paint.
Painting is one of the easiest ways to make a big impact on a room, and while painting the ceiling may be a little trickier than painting your walls, with a bit of preparation and planning, this is absolutely a project that you can tackle.
As disappointing as it may be, we all know that it’s not actually popcorn stuck up there. The bumpy stuff on your ceiling is usually made of a fibrous material that is either sponged or sprayed onto the ceiling for texture and acoustics. It was a very popular way to hide imperfections in ceilings from the mid-1950s all the way into the 1980s–but things changed in 1978.
Before it was banned in 1978, fibers that give popcorn ceilings that unique texture were often made of asbestos, which we know can increase the risk of several serious diseases in humans and animals, including asbestosis, mesothelioma, and lung cancer. However, builders were still allowed to use up any remaining asbestos they had on hand, so if your house was built prior to 1980, have your ceiling tested to make sure it's asbestos-free before doing any work on it. It's affordable, it only takes a couple of days to receive test results, and the Minnesota Department of Health can help you find contractors and a testing lab near you.
Read more: How to Remove Texture From Walls
Before shopping for any paint, figure out how much you'll need. To figure out the square footage of your room, multiply the length and width (for example, a 10’ x 12’ room is 120 square feet), and because popcorn ceilings can take twice as much paint to cover, buy double that amount of paint (so enough to cover 240 sq. ft. for a 10’ x 12’ room).
All the tools you need should be available at your local ReStore or hardware store. Here's a list to get you started:
Optional but helpful:
Start by emptying the entire room. Drips and splatters from the paint can get on furniture, light fixtures, floors, walls, and moldings, so make sure anything that can't move (including ceiling lights, fans, and chandeliers) is covered with drop cloths. Also, make sure to cover the entire floor and tape down the cloth near doorways to prevent tripping.
Use painter’s tape to mask off the top of the walls around the entire room. Consider using a pre-taped painter’s plastic that will hang down and cover the top foot of the wall. If you’re going to be painting the walls anyway, you can skip this step.
Painting over the dust and cobwebs will just adhere it to the ceiling and look messy. Get a duster out, or vacuum attachments, and really clean as much of the dust off as possible. Don't be afraid to break out a cleaning eraser for hard-stuck grime.
Cutting in paint where the ceiling meets the walls helps prevent you from getting paint on the walls. Pour some of the ceiling paint into a smaller container and use your 2” Angle Sash Brush to go around the entire perimeter of the ceiling. You’ll want to hand paint a couple of inches in so you don’t feel tempted to get the roller too close to the edges.
When you're painting the rest of the ceiling, use an extension pole instead of climbing up and down the ladder every time you need more paint. The ¾” nap roller cover holds a lot more paint than you would use on the walls. You’ll need it to get good coverage over the popcorn.
The technique here is a bit different than when painting a wall. Start in the center of the room and work toward the edge of the wall. Avoid going back and forth over the popcorn–there's not much holding it in place, so it might start coming down if you get it too wet.
After you finish the first coat, let it dry, and then apply a second coat of ceiling paint at a 90-degree angle to the first coat. After you finish painting, we recommend waiting until that second coat is at least 80% dry before removing the painter’s tape. Once dry, look for any areas that may need a little touch-up, but after that, voila! Your space will feel more open and refreshed with a fresh, clean ceiling.

Your gift unlocks bright futures! Donate now to create, preserve, and promote affordable homeownership in the Twin Cities.


Guest blog by Jill O'Gorman, professional designer
After any Minnesota winter, it's easy to get excited about summer do-it-yourself projects. And with our seasons, we don't have all that long before...
![How ReStore Works [VIDEO]](https://restore.tchabitat.org/hubfs/What%20is%20ReStore.png)
In this installment of DIY Friday at the WCCO studio, New Brighton ReStore Manager Jan Hagerman takes a break from upcycling projects—but for a good...